 Pre built UI
Adding / Modifying field validators
Step 1: Front End#
Now that you have added new fields to your signup form, let's see how you can add validators to make sure that your users provide the right information.
You can add a validate method to any formFields.
Building up on our previous example, let's add an age verification to our form:
- ReactJS
- Angular
- Vue
Important
supertokens-auth-react SDK and will inject the React components to show the UI. Therefore, the code snippet below refers to the supertokens-auth-react SDK.import SuperTokens from "supertokens-auth-react";
import EmailPassword from "supertokens-auth-react/recipe/emailpassword";
import Session from "supertokens-auth-react/recipe/session";
SuperTokens.init({
appInfo: {
apiDomain: "...",
appName: "...",
websiteDomain: "..."
},
recipeList: [
EmailPassword.init({
signInAndUpFeature: {
signUpForm: {
formFields: [{
id: "name",
label: "Full name",
placeholder: "First name and last name"
}, {
id: "age",
label: "Your age",
placeholder: "How old are you?",
optional: true,
/* Validation method to make sure that age is above 18 */
validate: async (value) => {
if (parseInt(value) > 18) {
return undefined; // means that there is no error
}
return "You must be over 18 to register";
}
}, {
id: "country",
label: "Your country",
placeholder: "Where do you live?",
optional: true
}]
}
}
}),
Session.init()
]
});
import SuperTokens from "supertokens-auth-react";
import EmailPassword from "supertokens-auth-react/recipe/emailpassword";
import Session from "supertokens-auth-react/recipe/session";

SuperTokens.init({
    appInfo: {
        apiDomain: "...",
        appName: "...",
        websiteDomain: "..."
    },
    recipeList: [
        EmailPassword.init({
            signInAndUpFeature: {
                signUpForm: {
                    formFields: [{
                        id: "name",
                        label: "Full name",
                        placeholder: "First name and last name"
                    }, {
                        id: "age",
                        label: "Your age",
                        placeholder: "How old are you?",
                        optional: true,

                        /* Validation method to make sure that age is above 18 */
                        validate: async (value) => {
                            if (parseInt(value) > 18) {
                                return undefined; // means that there is no error
                            }
                            return "You must be over 18 to register";
                        }

                    }, {
                        id: "country",
                        label: "Your country",
                        placeholder: "Where do you live?",
                        optional: true
                    }]
                }
            }
        }),
        Session.init()
    ]
});
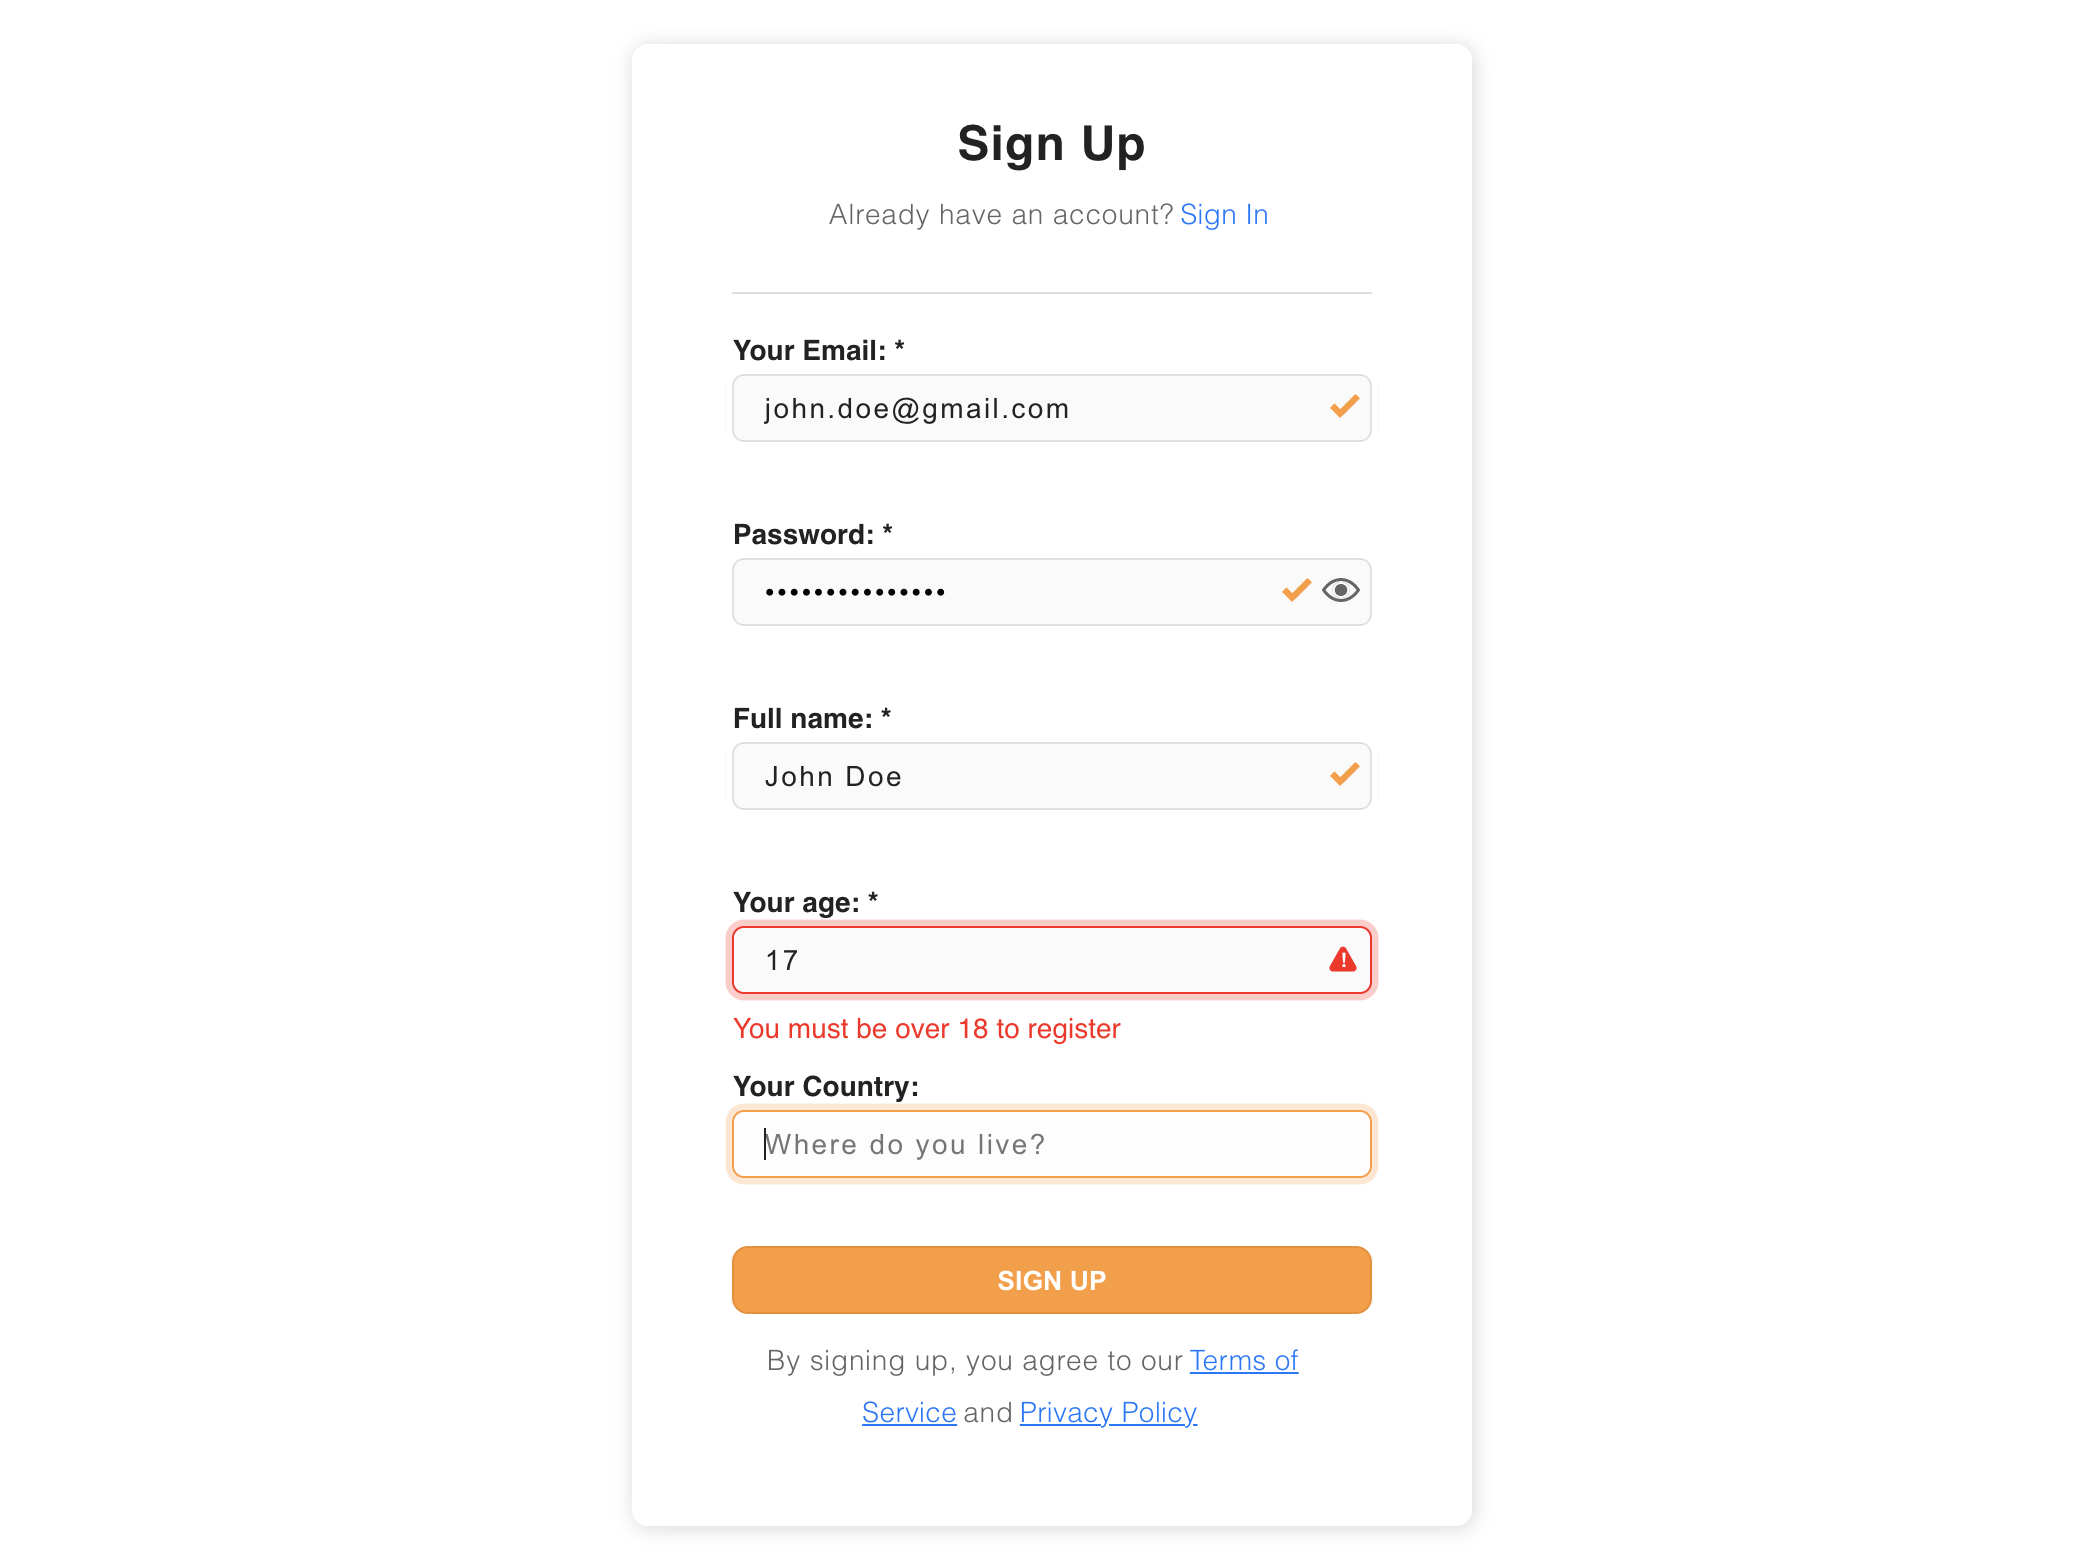
Here is what happens if someone tries to register with an age of 17:
Security
Front-end validation is great for user experience but you should always make sure that you are also applying these validations on the backend.
Step 2: Back End#
In your backend's SuperTokens init method, let's replicate the validate functions from above:
- NodeJS
- GoLang
- Python
- Other Frameworks
Important
import SuperTokens from "supertokens-node";
import EmailPassword from "supertokens-node/recipe/emailpassword";
import Session from "supertokens-node/recipe/session";

SuperTokens.init({
    appInfo: {
        apiDomain: "...",
        appName: "...",
        websiteDomain: "..."
    },
    supertokens: {
        connectionURI: "...",
    },
    recipeList: [
        EmailPassword.init({
            signUpFeature: {
                formFields: [{
                    id: "name"
                }, {
                    id: "age",
                    /* Validation method to make sure that age >= 18 */
                    validate: async (value, tenantId) => {
                        if (parseInt(value) >= 18) {
                            return undefined; // means that there is no error
                        }
                        return "You must be over 18 to register";
                    }
                }, {
                    id: "country",
                    optional: true
                }]
            }
        }),
        Session.init({
        })
    ]
});
import (
    "strconv"

    "github.com/supertokens/supertokens-golang/recipe/emailpassword"
    "github.com/supertokens/supertokens-golang/recipe/emailpassword/epmodels"
    "github.com/supertokens/supertokens-golang/supertokens"
)

func main() {
    countryOptional := true
    supertokens.Init(supertokens.TypeInput{
        RecipeList: []supertokens.Recipe{
            emailpassword.Init(&epmodels.TypeInput{
                SignUpFeature: &epmodels.TypeInputSignUp{
                    FormFields: []epmodels.TypeInputFormField{
                        {
                            ID: "name",
                        },
                        {
                            ID: "age",
                            Validate: func(value interface{}, tenantId string) *string {
                                age, _ := strconv.Atoi(value.(string))
                                if age >= 18 {
                                    // return nil to indicate success
                                    return nil
                                }
                                err := "You must be over 18 to register"
                                return &err
                            },
                        },
                        {
                            ID:       "country",
                            Optional: &countryOptional,
                        },
                    },
                },
            }),
        },
    })
}
from supertokens_python import init, InputAppInfo
from supertokens_python.recipe import emailpassword
from supertokens_python.recipe.emailpassword import InputFormField
from typing import Any

async def validate_age(value: Any, tenant_id: str):
    # Validation method to make sure that age >= 18
    if int(value) >= 18:
        return None # means that there is no error
    return 'You must be over 18 to register'

init(
    app_info=InputAppInfo(api_domain="...", app_name="...", website_domain="..."),

    framework='...',
    recipe_list=[
        emailpassword.init(
            sign_up_feature=emailpassword.InputSignUpFeature(
                form_fields=[
                    InputFormField(id='name'),
                    InputFormField(id='age', validate=validate_age),
                    InputFormField(id='country', optional=True)
                ]
            )
        )
    ]
)
Multi Tenancy
Notice the tenantId argument passed into the validate function. Using that, you can define custom logic per tenant. For example, you can define different password policies for different tenants.
Changing the default email and password validators#
By default, SuperTokens adds an email and a password validator to the sign-up form.
- The default email validator makes sure that the provided email is in the correct email format.
- The default password validator makes sure that the provided password:
- has a minimum of 8 characters.
- contains at least one lowercase character
- contains at least one number
important
- The email validator that you define for Sign up is also applied automatically to Sign In.
- The password validator that you define for Sign up is also applied automatically to reset password forms.
Step 1: Front End#
- ReactJS
- Angular
- Vue
Important
supertokens-auth-react SDK and will inject the React components to show the UI. Therefore, the code snippet below refers to the supertokens-auth-react SDK.import SuperTokens from "supertokens-auth-react";
import EmailPassword from "supertokens-auth-react/recipe/emailpassword";
SuperTokens.init({
appInfo: {
apiDomain: "...",
appName: "...",
websiteDomain: "..."
},
recipeList: [
EmailPassword.init({
signInAndUpFeature: {
signUpForm: {
formFields: [{
id: "email",
label: "...",
validate: async (value) => {
// Your own validation returning a string or undefined if no errors.
return "...";
}
}, {
id: "password",
label: "...",
validate: async (value) => {
// Your own validation returning a string or undefined if no errors.
return "...";
}
}]
}
}
})
]
});
import SuperTokens from "supertokens-auth-react";
import EmailPassword from "supertokens-auth-react/recipe/emailpassword";

SuperTokens.init({
    appInfo: {
        apiDomain: "...",
        appName: "...",
        websiteDomain: "..."
    },
    recipeList: [
        EmailPassword.init({
            signInAndUpFeature: {
                signUpForm: {
                    formFields: [{
                        id: "email",
                        label: "...",
                        validate: async (value) => {
                            // Your own validation returning a string or undefined if no errors.
                            return "...";
                        }
                    }, {
                        id: "password",
                        label: "...",
                        validate: async (value) => {
                            // Your own validation returning a string or undefined if no errors.
                            return "...";
                        }
                    }]
                }
            }
        })
    ]
});
Step 2: Back End#
- NodeJS
- GoLang
- Python
- Other Frameworks
Important
import SuperTokens from "supertokens-node";
import EmailPassword from "supertokens-node/recipe/emailpassword";

SuperTokens.init({
    appInfo: {
        apiDomain: "...",
        appName: "...",
        websiteDomain: "..."
    },
    supertokens: {
        connectionURI: "...",
    },
    recipeList: [
        EmailPassword.init({
            signUpFeature: {
                formFields: [{
                    id: "email",
                    validate: async (value, tenantId) => {
                        // Your own validation returning a string or undefined if no errors.
                        return "...";
                    }
                }, {
                    id: "password",
                    validate: async (value, tenantId) => {
                        // Your own validation returning a string or undefined if no errors.
                        return "...";
                    }
                }]
            }
        }),
    ]
});
import (
    "github.com/supertokens/supertokens-golang/recipe/emailpassword"
    "github.com/supertokens/supertokens-golang/recipe/emailpassword/epmodels"
    "github.com/supertokens/supertokens-golang/supertokens"
)

func main() {
    supertokens.Init(supertokens.TypeInput{
        RecipeList: []supertokens.Recipe{
            emailpassword.Init(&epmodels.TypeInput{
                SignUpFeature: &epmodels.TypeInputSignUp{
                    FormFields: []epmodels.TypeInputFormField{
                        {
                            ID: "email",
                            Validate: func(value interface{},  tenantId string) *string {
                                // Your own validation returning a string or nil if no errors.
                                return nil
                            },
                        },
                        {
                            ID: "password",
                            Validate: func(value interface{},  tenantId string) *string {
                                // Your own validation returning a string or nil if no errors.
                                return nil
                            },
                        },
                    },
                },
            }),
        },
    })
}
from supertokens_python import init, InputAppInfo
from supertokens_python.recipe import emailpassword
from supertokens_python.recipe.emailpassword import InputFormField
from typing import Any

async def validate_password(value: Any, tenant_id: str):
    pass # TODO

async def validate_email(value: Any, tenant_id: str):
    pass # TODO

init(
    app_info=InputAppInfo(api_domain="...", app_name="...", website_domain="..."),
    framework='...',
    recipe_list=[
        emailpassword.init(
            sign_up_feature=emailpassword.InputSignUpFeature(
                form_fields=[
                    InputFormField(id='password', validate=validate_password),
                    InputFormField(id='email', validate=validate_email)
                ]
            )
        )
    ]
)
